Gluten-Free Chocolate Mousse Cake That Steals the Show
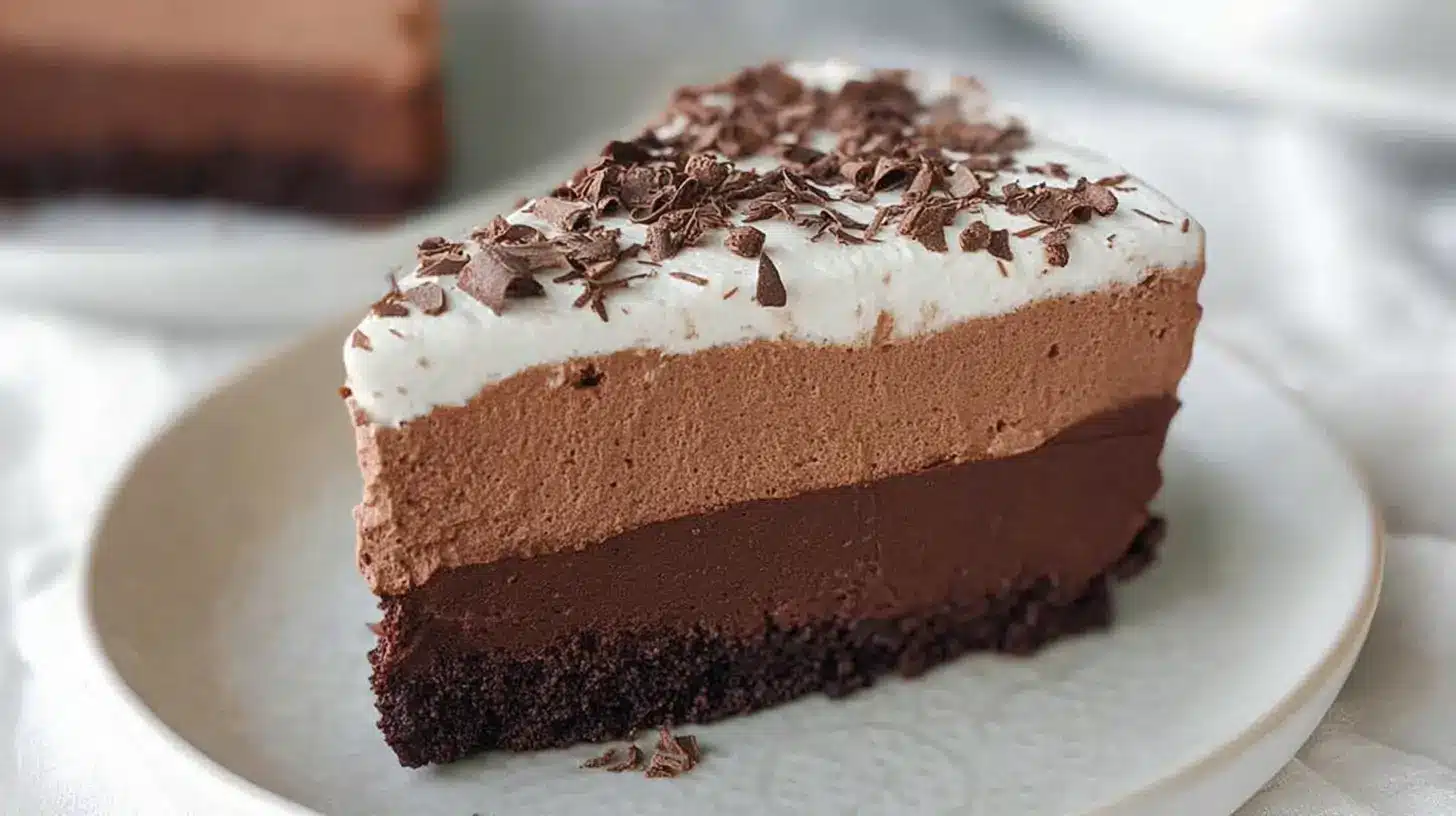
Need a jaw-dropping dessert that pleases every guest—gluten-free or not? This rich, layered treat checks every box. Imagine slicing into a dense, fudgy brownie base topped with silky-smooth chocolate mousse, then finished with a soft cloud of whipped cream. It looks bakery-worthy but is easier than you’d think. Whether it’s for a birthday, holiday, or dinner party, this cake brings wow-factor without the stress. Best part? No one will ever believe it’s gluten-free.
Table of Contents
Table of Contents
Why You’ll Love This Gluten-Free Chocolate Mousse Cake
- Rich, Dense, and Velvety: A fudgy brownie-style base layered with a smooth, airy mousse and fresh whipped cream.
- Foolproof Mousse: Cream cheese replaces raw eggs, creating a stable filling with a tangy twist—no curdling, no stress.
- Chocolate Lover’s Dream: Deep cocoa flavor in every bite. It’s dessert-first, gluten-free second.
- Make-Ahead Friendly: Prepares beautifully a day ahead, letting you relax and impress without last-minute fuss.
- Crowd Favorite: Even gluten-eaters won’t miss the wheat. This cake disappears fast at birthdays and dinner parties.
- Simple, Everyday Ingredients: No specialty stores needed. Everything comes from your regular grocery haul.
This recipe isn’t just another gluten-free dessert—it’s one guests request again and again.
Ingredients You’ll Need
For the Brownie Cake Base
- 8 oz bittersweet or semi-sweet chocolate, chopped or use high-quality chips
- 1 cup (2 sticks) unsalted butter, cut into pieces
- 1 cup granulated sugar
- 5 large eggs, room temperature
- 1 tbsp pure vanilla extract
- ¼ tsp fine salt
- ¼ cup gluten-free 1:1 baking flour (like Bob’s Red Mill or King Arthur)
For the Creamy Chocolate Mousse
- 8 oz bittersweet or semi-sweet chocolate, melted and slightly cooled
- 1⅓ cups powdered sugar
- 2 (8 oz) blocks full-fat cream cheese, softened to room temperature
- 2 tsp pure vanilla extract
- 2 cups cold heavy whipping cream (look for at least 36% fat for best texture)
For the Whipped Cream Topping
- ¾ cup cold heavy cream
- 2 tbsp powdered sugar
- 2 tsp pure vanilla extract
- Chocolate shavings or curls, for garnish (optional but stunning)
Tip: Use real vanilla and high-quality chocolate to make each layer shine.
Instructions
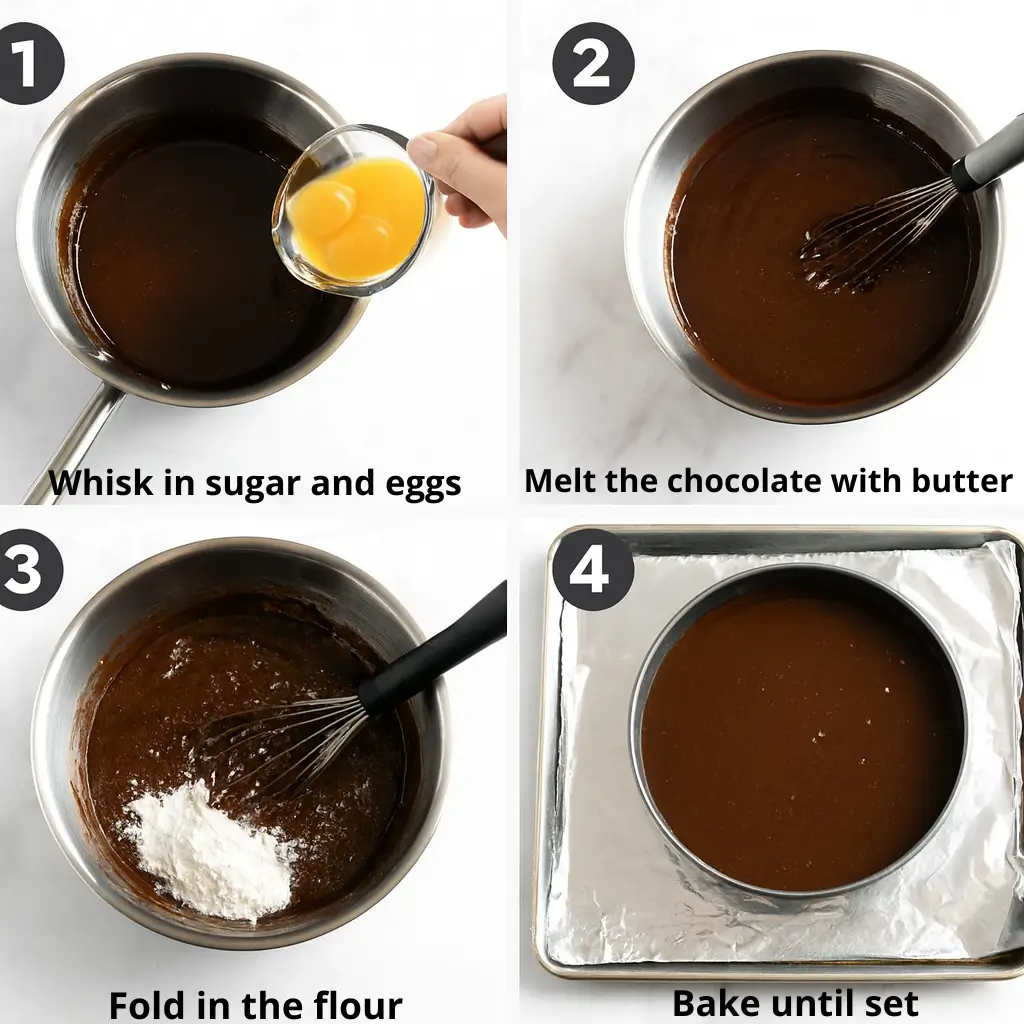
Step 1: Prepare the Fudgy Brownie Base
- Preheat your oven to 325°F. Lightly grease a 10-inch springform pan with non-stick spray.
- In a microwave-safe bowl, melt the butter and chocolate in 15-second bursts, stirring between each, until smooth.
- Whisk in the sugar, vanilla extract, and salt.
- Add the eggs one at a time, whisking well after each addition until fully incorporated.
- Gently fold in the gluten-free flour with a rubber spatula until no streaks remain.
- Pour the batter into the prepared pan. Smooth the top and bake for 30 to 35 minutes, or until a toothpick inserted in the center comes out mostly clean.
- Let the cake cool completely on a wire rack before adding the mousse layer. This is essential—warm cake will melt the mousse.
Step 2: Create the Velvety Chocolate Mousse
- Melt the chocolate in a microwave-safe bowl using short intervals. Stir until smooth and let it cool slightly.
- In a large mixing bowl, beat the softened cream cheese and powdered sugar until smooth and lump-free.
- Add in the melted chocolate and vanilla. Beat again until fully combined.
- With the mixer on low, slowly stream in the cold heavy cream. Once added, increase speed to medium-high and whip until the mousse becomes light and fluffy, about 3 to 4 minutes.
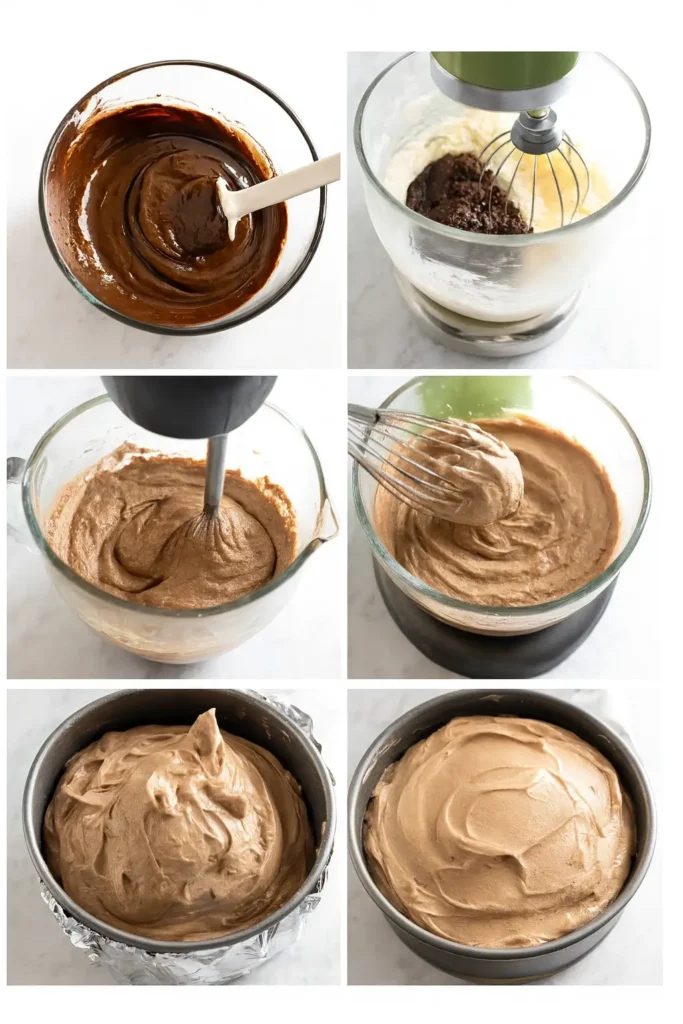
Step 3: Assemble the Cake and Chill
- Spoon the chocolate mousse onto the cooled brownie base. Use an offset spatula to spread it evenly to the edges.
- Cover the cake tightly with plastic wrap or foil.
- Refrigerate for at least 6 hours, or overnight. This allows the mousse to set properly and ensures clean slices.
Step 4: Garnish and Serve
- Just before serving, whip the remaining heavy cream, powdered sugar, and vanilla together until stiff peaks form.
- Spread the whipped cream over the mousse layer.
- Garnish with grated chocolate or chocolate curls for a professional finish.
- Run a thin knife around the edge of the pan before releasing the springform ring.
- Slice using a hot, clean knife for best presentation.
Serving and Storage Tips
Serving Suggestions
- For the cleanest slices, use a sharp knife dipped in hot water and wiped dry between each cut.
- Serve chilled for the best mousse texture and contrast between layers.
- This cake is ideal for birthdays, dinner parties, or holidays where you want an impressive, make-ahead dessert.
Storage Guidelines
- Refrigeration: Keep the assembled cake covered in the fridge for up to 3 days. It holds its shape well and the mousse stays creamy.
- Make-Ahead: You can prepare the brownie base and mousse a day in advance. Add the whipped cream topping just before serving for the freshest presentation.
- Freezing: While the mousse texture may change slightly, the cake can be frozen (without whipped cream) for up to one month. Wrap tightly and thaw overnight in the fridge.
Helpful Notes
Essential Tips for Success
Use Room Temperature Cream Cheese
Softened cream cheese blends smoothly, preventing lumps in the mousse. Cold cream cheese can ruin the texture.
Don’t Rush the Cooling Process
The brownie base must be fully cooled before topping it with mousse. Even a slightly warm base can cause the mousse to melt and slide.
Choose the Right Cream
Use heavy whipping cream with at least 36% fat. Lower-fat versions may not whip properly or hold their shape in the mousse.
How to Get Clean Slices Every Time
Dip a sharp knife into hot water, then wipe it clean with a towel between each slice. This prevents dragging and gives smooth, professional-looking cuts.
Bonus Tip
For added texture, consider sprinkling crushed gluten-free cookies or nuts between the mousse and whipped cream layers.

Foolproof Gluten-Free Chocolate Mousse Cake with Rich Brownie Layer
Ingredients
Brownie Cake Base
- 8 oz bittersweet or semi-sweet chocolate chopped or use high-quality chips
- 1 cup unsalted butter cut into pieces
- 1 cup granulated sugar
- 5 large eggs room temperature
- 1 tbsp pure vanilla extract
- 0.25 tsp fine salt
- 0.25 cup gluten-free 1:1 baking flour like Bob’s Red Mill or King Arthur
Creamy Chocolate Mousse
- 8 oz bittersweet or semi-sweet chocolate melted and slightly cooled
- 1.33 cups powdered sugar
- 16 oz full-fat cream cheese softened to room temperature
- 2 tsp pure vanilla extract
- 2 cups cold heavy whipping cream at least 36% fat
Whipped Cream Topping
- 0.75 cup cold heavy cream
- 2 tbsp powdered sugar
- 2 tsp pure vanilla extract
- chocolate shavings or curls optional but stunning
Instructions
- Make the Brownie Base: Preheat oven to 325°F. Grease a 10-inch springform pan.
- Melt chocolate and butter in a microwave-safe bowl, stirring every 15 seconds until smooth.
- Whisk in sugar, vanilla, and salt. Add eggs one at a time, whisking well. Fold in gluten-free flour.
- Pour into pan and bake for 30–35 minutes. Cool completely before adding mousse.
- Make the Chocolate Mousse: Melt chocolate and let cool slightly. Beat cream cheese and powdered sugar until smooth.
- Add melted chocolate and vanilla. Mix to combine. Slowly add heavy cream and whip until fluffy, 3–4 minutes.
- Assemble and Chill: Spread mousse over the cooled brownie base. Cover and chill for at least 6 hours or overnight.
- Add Whipped Cream Topping: Whip cream, powdered sugar, and vanilla until stiff peaks form. Spread over mousse. Garnish with chocolate shavings. Release springform, slice, and serve.
Notes
Nutrition
Calories: 359kcal | Carbohydrates: 40g | Protein: 3g | Fat: 21g | Saturated Fat: 12g | Cholesterol: 131mg | Sodium: 253mg | Potassium: 47mg | Fiber: 1g | Sugar: 38g | Vitamin A: 686IU | Calcium: 19mg | Iron: 1mgConclusion
This gluten-free chocolate mousse cake offers everything you want in a dessert—rich, creamy, satisfying, and completely wheat-free. From the dense brownie base to the airy mousse and whipped cream topping, every bite delivers indulgence without compromise. Whether you’re baking for a birthday, holiday, or a weekend treat, this cake guarantees success.
Did you try this recipe? Leave a comment and star rating below. I’d love to hear which gluten-free flour worked best for you or any creative twists you added.
If you loved it, share your creation on Don’t forget to share your results on Pinterest . and tag me. Seeing your versions always makes my day.
Frequently Asked Questions
Can gluten-free eat chocolate mousse?
Yes. Traditional chocolate mousse made with chocolate, cream, and eggs is naturally gluten-free. This recipe is 100% safe for those avoiding gluten, including the base, mousse, and toppings.
What makes mousse not gluten-free?
Mousse itself is usually gluten-free, but it’s important to check for:
- Cake bases made with wheat flour.
- Add-ins like cookie crumbs or candy that may contain gluten.
- Thickeners or stabilizers in commercial versions.
- Cross-contamination from shared kitchen tools or surfaces.
What is the best gluten-free flour for fluffy cakes?
For this cake’s fudgy base, a gluten-free 1:1 baking flour blend (with xanthan gum) works best. Brands like King Arthur or Bob’s Red Mill produce reliable results with great texture.
Can I make this cake dairy-free?
You can, with a few swaps. Use dairy-free butter, plant-based cream cheese, and a high-fat coconut cream in place of heavy cream. The taste and texture will differ slightly but still be delicious.
Why is my chocolate mousse runny?
Most likely, the cream wasn’t whipped long enough or the ingredients were too warm. Always start with cold cream and chill the base before topping.
Why did my gluten-free cake crack?
Overbaking or sudden temperature changes can cause cracks. Bake just until set, and allow the cake to cool gradually before chilling.
Can I make this cake ahead of time?
Yes. This cake is best when made the night before. The mousse needs time to set, and the flavors deepen after chilling overnight.
How do I store leftovers?
Keep slices covered in the refrigerator for up to 3 days. For longer storage, freeze individual slices without the whipped cream topping.
Is this recipe freezer-friendly?
Yes, the cake (minus the whipped topping) can be frozen for up to one month. Wrap tightly and thaw in the fridge overnight.
Fun Flavor Variations
Mocha Mousse Cake
Add 2 teaspoons of espresso powder to the brownie batter and 1 teaspoon to the mousse. This deepens the chocolate flavor and adds a subtle coffee twist.
Peppermint Chocolate Mousse Cake
Mix ½ teaspoon of peppermint extract into the mousse layer. Garnish with crushed peppermint candies or a sprinkle of cocoa powder for a festive finish.
Spiked Amaretto Mousse Cake
Stir in 1 tablespoon of Amaretto, Grand Marnier, or Kahlúa into the mousse with the vanilla. This adds a rich, elegant flavor—perfect for grown-up gatherings.
Feel free to mix and match flavors to suit your occasion or personal taste. These variations offer a simple way to customize your cake while keeping the base recipe intact.