Gluten Free Potato Latkes: Crispy, Light, and Never Soggy
Potato latkes are a beloved part of Hanukkah tradition, but this version takes things further. It’s entirely gluten-free and unbelievably crispy. No more heavy, soggy pancakes. This guide delivers the secret to light, golden, thin-and-lacy latkes that shatter with every bite. You’ll get two cooking methods: the classic pan-fried crunch and a lighter, air fryer option. And yes, we’re revealing the ultimate starch trick that most recipes skip. Ready to master the best gluten free latkes of your life? Let’s get started.
Table of Contents
Why You’ll Love This Recipe
• Crispy Every Time: The texture is thin, lacy, and perfectly golden without being greasy or soggy
• Two Cooking Options: Choose between the traditional pan-fried method or the healthier air fryer version
• Naturally Gluten-Free: Uses smart binder swaps like potato starch instead of flour or matzo meal
• Make-Ahead Friendly: These latkes reheat beautifully for stress-free holiday prep
• Crowd-Pleaser: Whether it’s Hanukkah or a weekend brunch, everyone loves these crispy bites
• Comfort Meets Simplicity: Made with everyday ingredients, they hit that nostalgic spot while staying allergy-conscious
• No Mystery Steps: Clear instructions, pro tips, and troubleshooting make this recipe easy for first-timers and pros alike
Ingredients for Perfect Gluten-Free Latkes
Potato Selection (Why Russets Win)
Starch vs. Moisture: Why Russets are the Best Choice
Russet potatoes are the gold standard for latkes. They have a high starch content and low moisture, which is exactly what you want for crispy results. The starch helps bind the mixture naturally, while the dry texture prevents soggy patties.
Yukon Gold Potatoes as an Alternative
If you can’t find russets, Yukon Gold potatoes are your next best option. They have a creamier texture and slightly less starch, which can still work well. Avoid white or red potatoes as they hold too much moisture and often turn mushy when fried.
The Gluten-Free Binder Breakdown
The GF Binder Showdown: Potato Starch vs. Rice Flour vs. Arrowroot
| Binder | Texture Outcome | Notes |
| Potato Starch | Crisp edges with strong hold | Best overall for crispy gluten-free latkes |
| White Rice Flour | Light and neutral | Mild flavor, helps with browning |
| Arrowroot Starch | Smooth and stable | Comparable to potato starch, good binder |
CRITICAL WARNING: Avoid Xanthan Gum
Never use xanthan gum in your gluten-free blend for latkes. It holds on to moisture, leading to gummy and soggy results. It’s great in baking, but not in anything fried.
Other Essential Ingredients
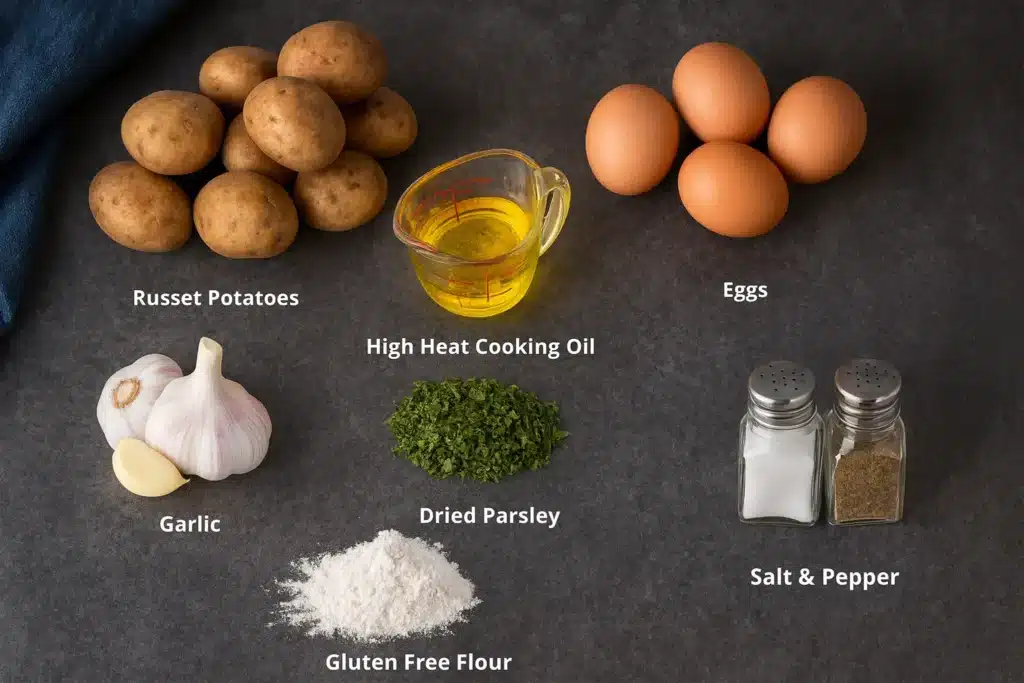
For the base mixture
6 cups shredded Russet potatoes (approx. 2.5 lbs or 1.1 kg, peeled and freshly grated)
½ cup thinly sliced yellow onions
1 large egg (room temperature)
¼ cup potato starch (Gluten-free flour blend or matzo meal can be used as an alternative)
1 teaspoon garlic powder
2 teaspoons parsley (fresh or dried)
1 teaspoon sea salt
½ teaspoon black pepperFor cooking
Avocado oil (3 tablespoons for air fryer method or enough to fill 1 inch in skillet for frying)
The Prep Phase: Mandatory Moisture Removal & The Starch Secret
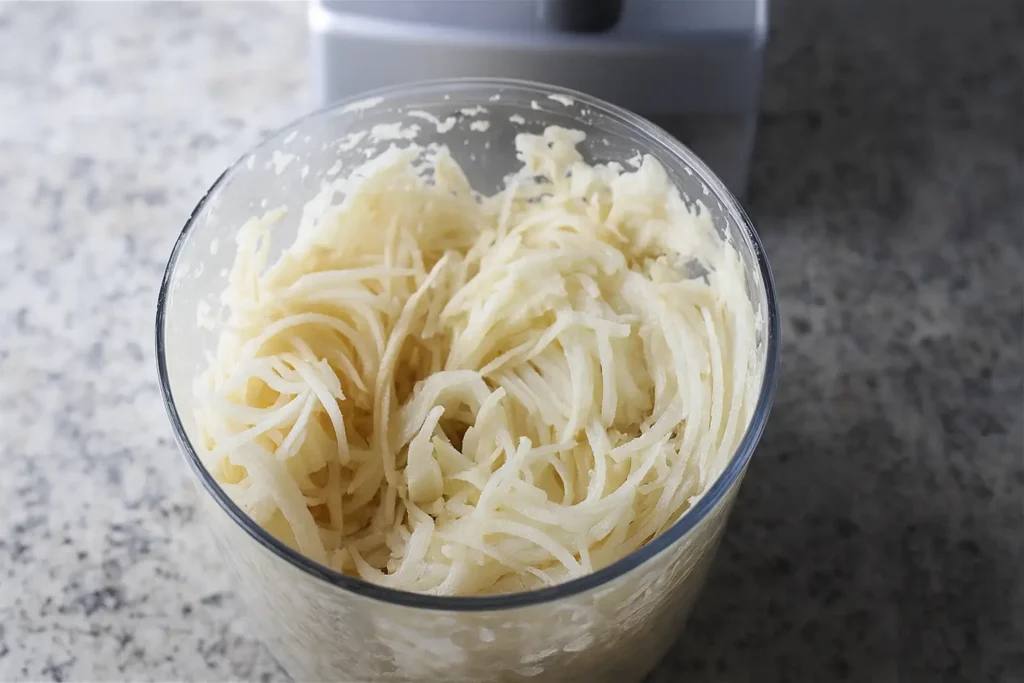
Shredding Potatoes: Hand Grate vs. Food Processor
Using a box grater gives the potatoes a coarse, uneven texture that fries up beautifully with crispy edges. A food processor is faster but can over-process if you’re not careful. If using a food processor, use the shredding disk only and avoid pulsing after grating. Overworked potatoes release too much liquid and lose that classic lacy texture.
The Food Processor Warning: Don’t Over-Process for the Best Lace Texture
Always stop after the first pass through the shredder attachment. Never blend the shreds further. The goal is to keep long strands that crisp up well. Over-processing leads to a gluey mix that won’t hold together during frying.
Mandatory Moisture Removal
To get crisp results, you must remove as much liquid as possible from the shredded potatoes and onions. Wrap the mixture in a clean dish towel or cheesecloth and twist tightly over the sink. Keep twisting until you feel the resistance and the flow of liquid slows down. The drier the mix, the better the final texture.
How to Squeeze Out Excess Liquid (Towel vs. Cheesecloth Method)
Both methods work, but cheesecloth allows for a tighter twist. Lay it flat, pile the mixture in the center, fold the sides over, and twist from both ends. If using a towel, be sure it’s clean and doesn’t carry fabric softener residue, which can transfer to food.
Master Tip: Reserving and Reincorporating the Potato Starch
This is the trick that separates average from amazing. After squeezing the moisture out, let the liquid sit in a bowl for about five to ten minutes. You’ll notice a thick white layer collecting at the bottom. That’s pure potato starch. Carefully pour off the water on top, keeping the starch. Scrape the starch back into your potato mix before adding the rest of the ingredients. This natural binder helps hold everything together and boosts crispiness without adding any flour.
Step-by-Step Instructions: Mixing and Forming the Latke Batter
1. Prep your potatoes and onions
Shred the peeled russet potatoes and yellow onions using a box grater or the shredding disc of a food processor. Work quickly to prevent browning.
2. Squeeze out all excess moisture
Place the shredded mixture into a clean towel or cheesecloth. Twist tightly over the sink to remove as much liquid as possible. Then, let the drained liquid sit in a bowl for five to ten minutes to collect the starch.
3. Reuse the potato starch
After the liquid settles, pour off the water and scrape the white starch at the bottom back into your potatoes. This is a natural binder that makes a big difference.
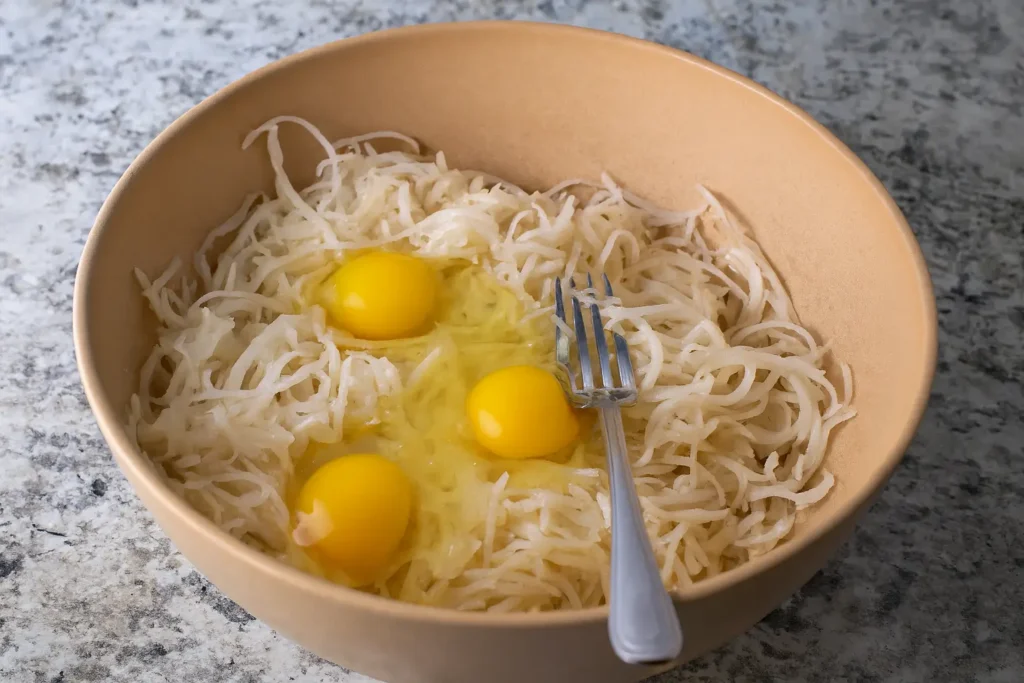
4. Mix the batter
In a large bowl, combine the dried potato and onion mix with the egg, parsley, potato starch, garlic powder, salt, and pepper. Mix thoroughly until well combined.
5. Test the batter
Before cooking the full batch, fry one small patty to check for seasoning and texture. Adjust salt or add a little more starch if it falls apart.
6. Shape the latkes
Scoop a heaping spoonful of the mixture and form it into a small, flat patty with your hands. Keep the thickness even for consistent cooking.
7. You’re ready to cook
Move on to your preferred method, either pan-frying or air frying. Both work beautifully with this batter.
Two Ways to Cook: Frying vs. Air Frying Latkes
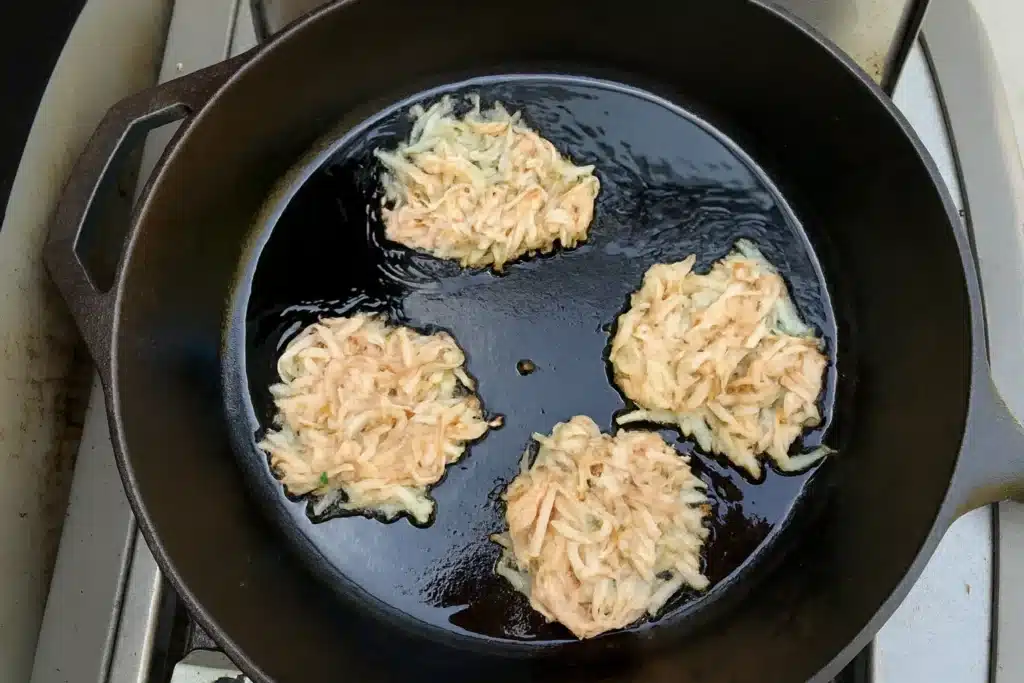
Method 1: Classic Pan-Frying for the Crispiest Edges
The Science of Oil Temperature: Why You Need 365°F to 375°F
Oil that’s too cool will soak into the latkes, making them greasy and limp. Oil that’s too hot burns the outside before the inside cooks through. The sweet spot is between 365°F and 375°F. This temperature range allows the latkes to crisp quickly without absorbing too much oil. Use a thermometer to monitor the heat for consistent results.
Frying Technique: How to Prevent Crowding and Maintain Oil Temp
Add just a few latkes to the pan at a time to avoid crowding. Too many will drop the oil temperature, leading to sogginess. Fry each batch for about three to four minutes per side until golden and crisp. Use a fork and spatula together to flip gently without breaking them. Once done, transfer to a paper towel-lined wire rack to drain while you finish the rest.
Method 2: Healthy, Low-Fat Gluten-Free Air Fryer Latkes
Air Fryer Time and Temp Guide
Preheat your air fryer to 400°F for five minutes. Lightly brush or spray the basket with avocado oil. Place the latkes in a single layer without overlapping. Spray or brush the tops with oil as well. Cook for six minutes, flip, then cook for another six minutes. They should come out golden, crisp, and ready to serve.
Air Fryer vs. Pan-Fried: A Quick Comparison
| Method | Texture | Oil Usage | Best For |
| Pan-Fried | Crisp with soft center | Higher oil needed | Traditional flavor and texture |
| Air Fryer | Crispy and light | Minimal oil | Lower-fat and easier cleanup |
Visual reference: Close-up comparison showing pan-fried latkes with lacy, uneven edges versus air-fried latkes with a more uniform, golden texture.
Looking for more healthy ideas? Check out our other gluten-free air fryer recipes for quick, crispy meals without the extra oil.
Troubleshooting, Storage, and Reheating
Help My Latkes Are Breaking or Falling Apart
This usually means there’s too much moisture or not enough binder. Make sure you squeezed the potatoes and onions thoroughly. If the mixture still feels wet, add a bit more potato starch. A test latke before the full batch helps catch this early.
Make-Ahead and Storage Tips
Once cooled, store your cooked latkes in an airtight container in the fridge. They stay fresh for three to five days. Separate layers with parchment paper to keep them from sticking together.
How to Reheat Latkes to Restore Crispiness
Reheating in the Oven
Preheat your oven to 375°F. Place the latkes on a wire rack set over a baking sheet. This allows heat to circulate evenly. Bake for ten to twelve minutes until they’re heated through and re-crisped on the outside.
Reheating from Frozen
No need to thaw. Preheat the oven or air fryer to 400°F. Reheat the frozen latkes for twelve to fifteen minutes in the oven or seven to ten minutes in the air fryer. They’ll come out hot and crispy without getting greasy.
Serving Suggestions and Dietary Variations
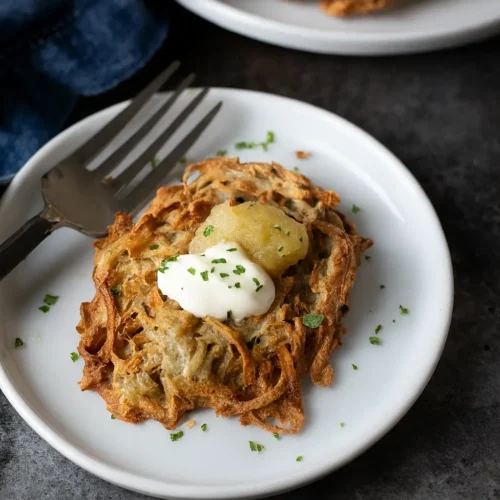
Classic Toppings
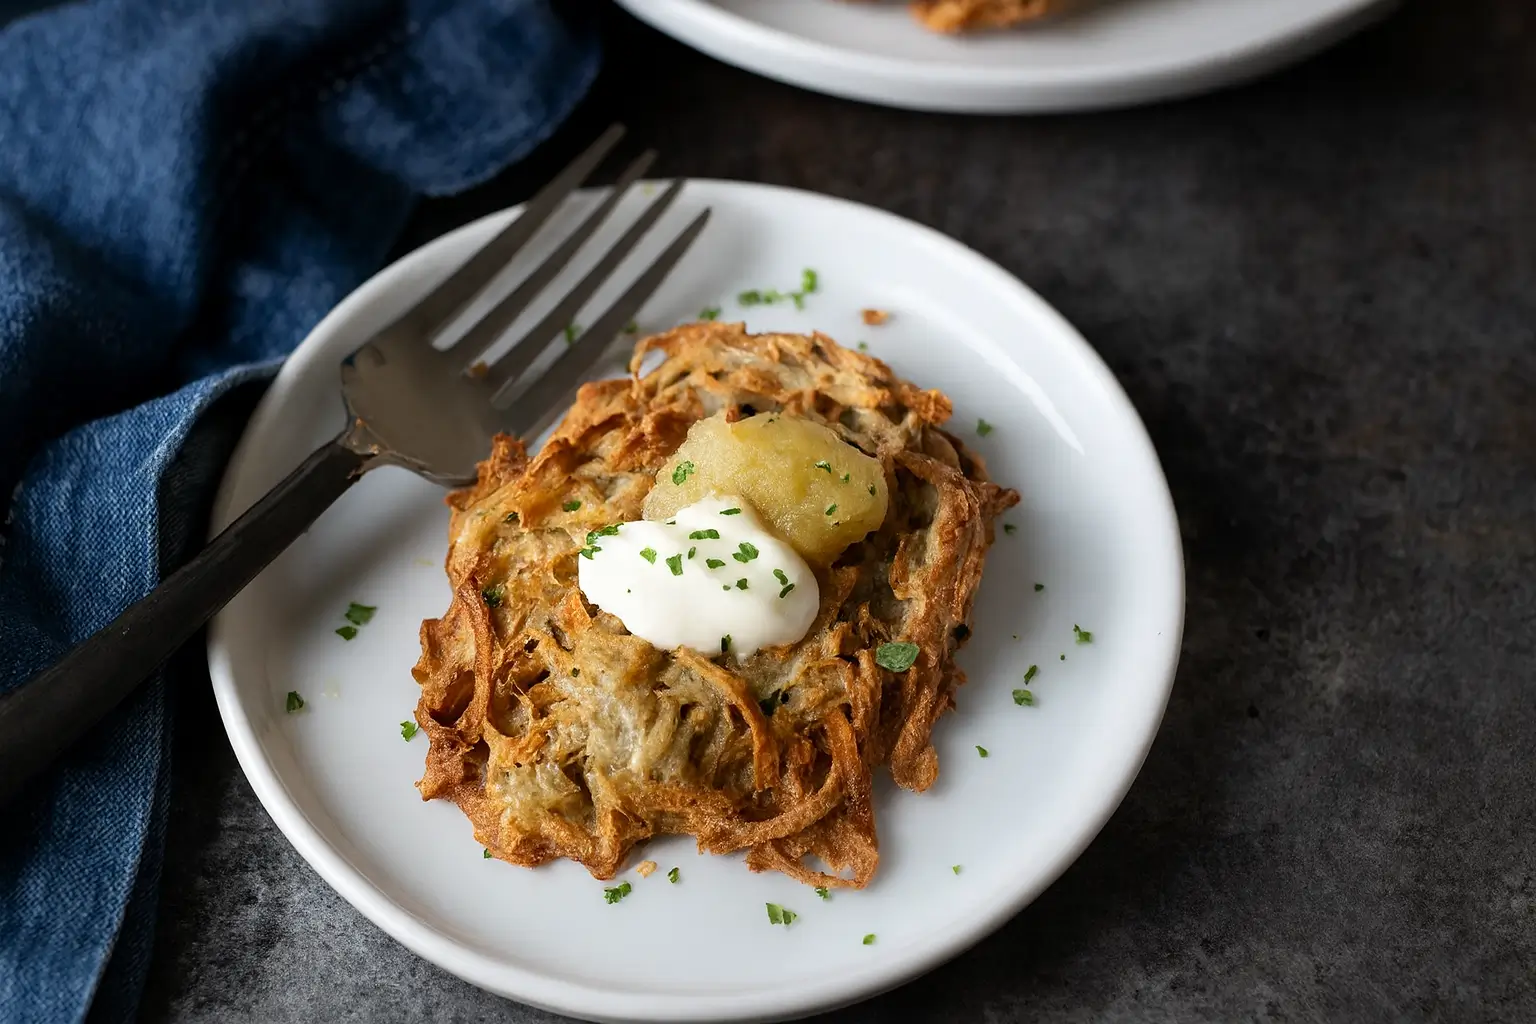
The most traditional way to enjoy latkes is with a dollop of applesauce or sour cream. The sweetness of the applesauce contrasts beautifully with the savory crunch, while sour cream adds a cool, creamy finish.
Unique Toppings
Try topping your latkes with smoked salmon, a touch of crème fraîche, and chopped chives. Another great combo is avocado slices with a sprinkle of chili flakes. You can also serve them with beet hummus or herbed yogurt for something different.
Vegan and Dairy-Free Latkes
To make these without eggs, try using aquafaba (the liquid from canned chickpeas) as a binder. About three tablespoons replaces one egg. For a dairy-free topping, choose plant-based sour cream or skip it in favor of fresh herbs and a drizzle of olive oil.
Passover-Approved Latkes
For a Passover-friendly version, swap out the gluten-free flour for potato starch or certified gluten-free matzo meal. Make sure all other ingredients, including oil, are kosher for Passover.
Conclusion
These gluten free potato latkes deliver everything you want in a holiday favorite. They’re crispy on the outside, tender in the center, and packed with flavor. Whether you fry them the classic way or go lighter with the air fryer, they come out just right every time.
With the starch secret, smart binder choices, and clear steps, this recipe makes success easy. Perfect for Hanukkah, brunch, or any time you crave comfort food that satisfies without gluten.
Tried this recipe? Leave a comment and a star rating to let us know how it went. Did you pan-fry or use the air fryer? What toppings did you try? Share your experience below and pass it on to someone who needs a new favorite latke recipe.
Share your creation on Pinterest or Facebook so others can enjoy it too. What twist did you try? Let us know in the comments.
The Ultimate Crispy Gluten Free Potato Latkes
Ingredients
Latke Base
- 6 cups shredded Russet potatoes approx. 2.5 lbs or 1.1 kg, peeled and freshly grated
- 0.5 cup thinly sliced yellow onions
- 1 large egg room temperature
- 0.25 cup potato starch Gluten-free flour blend or matzo meal can be used as an alternative
- 1 tsp garlic powder
- 2 tsp parsley fresh or dried
- 1 tsp sea salt
- 0.5 tsp black pepper
For Cooking
- 3 tbsp avocado oil for air fryer method or enough to fill 1 inch in skillet for frying
Instructions
- Shred peeled russet potatoes and onions using a box grater or food processor with shredder disc. Work quickly to avoid browning.
- Place the shredded mix in a clean towel or cheesecloth. Twist over the sink to remove as much liquid as possible.
- Let the drained liquid sit in a bowl for 5–10 minutes to collect starch. Pour off water and scrape starch back into the mix.
- In a large bowl, combine potato mixture with egg, potato starch, garlic powder, parsley, salt, and pepper. Mix until well combined.
- Test the batter by frying a small patty. Adjust seasoning or binder if needed.
- Form mixture into small, flat patties using your hands. Keep thickness even.
- For pan-fried latkes: Heat avocado oil to 365–375°F. Fry latkes in batches for 3–4 minutes per side until golden. Drain on paper towel-lined rack.
- For air fryer latkes: Preheat to 400°F. Brush basket and latkes with oil. Air fry in a single layer for 6 minutes per side until golden and crisp.
Notes
Nutrition
Calories: 89kcal
Carbohydrates: 13g
Protein: 2g
Fat: 3g
Saturated Fat: 1g
Cholesterol: 12mg
Sodium: 174mg
Potassium: 272mg
Fiber: 1g
Sugar: 1g
Vitamin A: 17IU
Vitamin C: 4mg
Calcium: 12mg
Iron: 1mg
Frequently Asked Questions (FAQ) : Gluten Free Potato Latkes
Can you use gluten-free flour for latkes?
Yes, you can. A quality gluten-free flour blend works well as a binder. For even crispier results, many prefer potato starch or white rice flour.
Can you make potato latkes without flour?
Absolutely. You can skip flour entirely by using potato starch as the binder. Just be sure to squeeze out the moisture and reuse the settled starch from the potato water.
Is potato pancake gluten-free?
Not always. While potatoes are gluten-free, traditional recipes often include wheat flour or matzo meal. This recipe uses gluten-free binders like potato starch.
Can gluten-free eat potato flour?
Yes, potato flour and potato starch are both gluten-free. Potato starch is preferred for latkes because it binds better and produces a crispier texture.
What makes potatoes not gluten-free?
Potatoes themselves are naturally gluten-free. The issue comes with added ingredients like regular flour or matzo meal.
Why are my latkes breaking or falling apart?
The most common cause is excess moisture. Another reason could be not enough binder. Use the potato starch trick or add more if needed.